For this tag, I decided to play around with a technique I saw on Claudine Helmuth's blog. I used a Prima stencil and a sponge with acrylic paints to create a background on cheap white tissue paper. By sponging on the paint, you have more control as the amount applied (which impacts bleed through and drying time). After I let it completely dry, I place a tag under the tissue to see where I wanted the design to fall. Once I like the placement, I cut out the tag shape.
A little gel medium on the tag was all it took to adhere the tissue to the tag. In smoothing it out, I did tear a bit of the tissue. So, I decided to add an image:
I stamped the Tim Holtz umbrella man in Archival black. I re-stamped the umbrella portion in Marvy red and cut them all out. I used mounting tape to attach umbrella man to the tag. This will probably end up in an art journal.
Showing posts with label Stencils. Show all posts
Tuesday, January 29, 2013
Wednesday, November 21, 2012
Since I pretty much missed October, I decided to use a few new items that I purchased to make Halloween cards. At least it's still Fall!
The latest journal page for my swap with Kate. Stains, sprays, inks used with stencils and stamps. The fun Halloween saying is from Artistic Outpost. I had "Nightmare Before Christmas" playing in the background - the three fellows in the circle (Stampotique) reminded me of Oogy Boogy's henchmen!
Wednesday, November 7, 2012
Finally...
That word sums up a lot of things going on in my life. I am finally able to move forward a bit since my mother's death in September. I am finally accepting that some extended family relationships are over due to egregious behavior on the part of these relatives. I can finally move forward with settling the trust. And, I am finally feeling a bit more creative.
I made this journal page (not my favorite as I am a bit rusty) in an attempt to get back to art and to move forward. Finally!
Tuesday, September 4, 2012
Tuesday's Tip
With all the family issues and travel, I have not had much time to create. However, I have been able to cruise around the web for ideas. I found a fun stencil/mask idea on the Paper Crafter's blog. Did you know you could use your thin dies as masks? Nestibilities dies would be great for shapes in different sizes!
Thursday, August 2, 2012
Under the Sea
I was running behind in my art journal exchange with my friend, Kate. I have been attempting to have a vision of a completed page, but it has not really been working. So, I am going with the flow!
This page started with a variety of spray mists - Dylusions (LOVE these), Perfect Pearls Mists, and Glimmer Mists. After each layere dried, I attempted more spraying over stencils - circles and trees. When all was dry, it seemed to me that I was working toward a water scene! For the little mermaids on the left, I stamped small fish and added the tails to Art Chix mini gals. The depth and shimmer of the pages does not really show in the photo.
Do you plan out your pages or go with the flow?
This page started with a variety of spray mists - Dylusions (LOVE these), Perfect Pearls Mists, and Glimmer Mists. After each layere dried, I attempted more spraying over stencils - circles and trees. When all was dry, it seemed to me that I was working toward a water scene! For the little mermaids on the left, I stamped small fish and added the tails to Art Chix mini gals. The depth and shimmer of the pages does not really show in the photo.
Do you plan out your pages or go with the flow?
Friday, July 27, 2012
Squirrely Challenge
It is Squirrely Challenge time! Nancy posted the "Spritz Distress" technique from the current edition of the Technique Junkies Newsletter. I have been on a green kick - so I used 3 different shades of green Distress Ink, a leaf stencil and a "spritz" of water:
Card stock is from Club Scrap. Stamps are from Stampin' Up and Silver Crow. Sans Souci roughly translates into without cares/worries. To see what the other "squirrel girls" are doing, us this link.
Friday, July 6, 2012
Stencil with Gel Medium
Yes, it was tag week for me! I tried another technique that came from May Flaum. I took my trusty tag and a Tattered Angels stencil and slopped on some of this gel medium.
As you can see, I was very liberal with the application. I carefully lifted the stencil (technically, this is a mask) and left it to dry for a day. I sprayed some Dylusions Mist and let it dry further. I was thinking of using the result as a tree, complete with some birds and blooms. However, the vibrancy of the Dylusions color had me re-think. I thought it looked more like ocean coral (without the orange color). So, the final result was this:
This is actually a pretty interesting technique. I plan on trying it with a few other mediums that I own.
As you can see, I was very liberal with the application. I carefully lifted the stencil (technically, this is a mask) and left it to dry for a day. I sprayed some Dylusions Mist and let it dry further. I was thinking of using the result as a tree, complete with some birds and blooms. However, the vibrancy of the Dylusions color had me re-think. I thought it looked more like ocean coral (without the orange color). So, the final result was this:
This is actually a pretty interesting technique. I plan on trying it with a few other mediums that I own.
Thursday, June 7, 2012
Spray Paint part 2
Yesterday, I posted a spray paint project my friend,Nancy, and I did. I was letting the finished projects dry an extra day before using them. The back of the desktop organizer:
The same object - side view:
And, the completed view of the organizer as it will sit on my desk:
I added polka dot Washi tape to the front and along the edges of the compartments. The completed plastic tumbler that I use for miscellaneous storage:
The top band is actually painted red, while the dotted pattern is painted black. You could also add stamping or collage if you do a project like this. I liked the graphic urban design feel of the paint without any more decoration.
The same object - side view:
And, the completed view of the organizer as it will sit on my desk:
I added polka dot Washi tape to the front and along the edges of the compartments. The completed plastic tumbler that I use for miscellaneous storage:
The top band is actually painted red, while the dotted pattern is painted black. You could also add stamping or collage if you do a project like this. I liked the graphic urban design feel of the paint without any more decoration.
Wednesday, June 6, 2012
Spray Paint!
No, I have not been out tagging public property! Maryjo McGraw posted a project involving decorating plain plastic items. Nancy and I are followers of Maryjo's "secret blog", and decided we would try the spray painting project. Since we knew we would not do this on our own, we met at my house with items, cans of paint and stencils.
First, I sprayed a clear desktop sorter with white spray paint. I did 2 light coats. I also sprayed a plastic tumbler that I use for water for paint brushes.
I really love this stencil and thought I would use it on my plastic pieces. Using painter's tape and newspaper, I masked off the portions I did not want to stencil. I used a red "stained glass" effect spray paint that Nancy brought over. I used the same stencil and paint color on my tumbler.
I added a few sprays of black paint as well. The photo above captures our home made spray booth and materials we used. My desk sorter is standing on end after being sprayed.
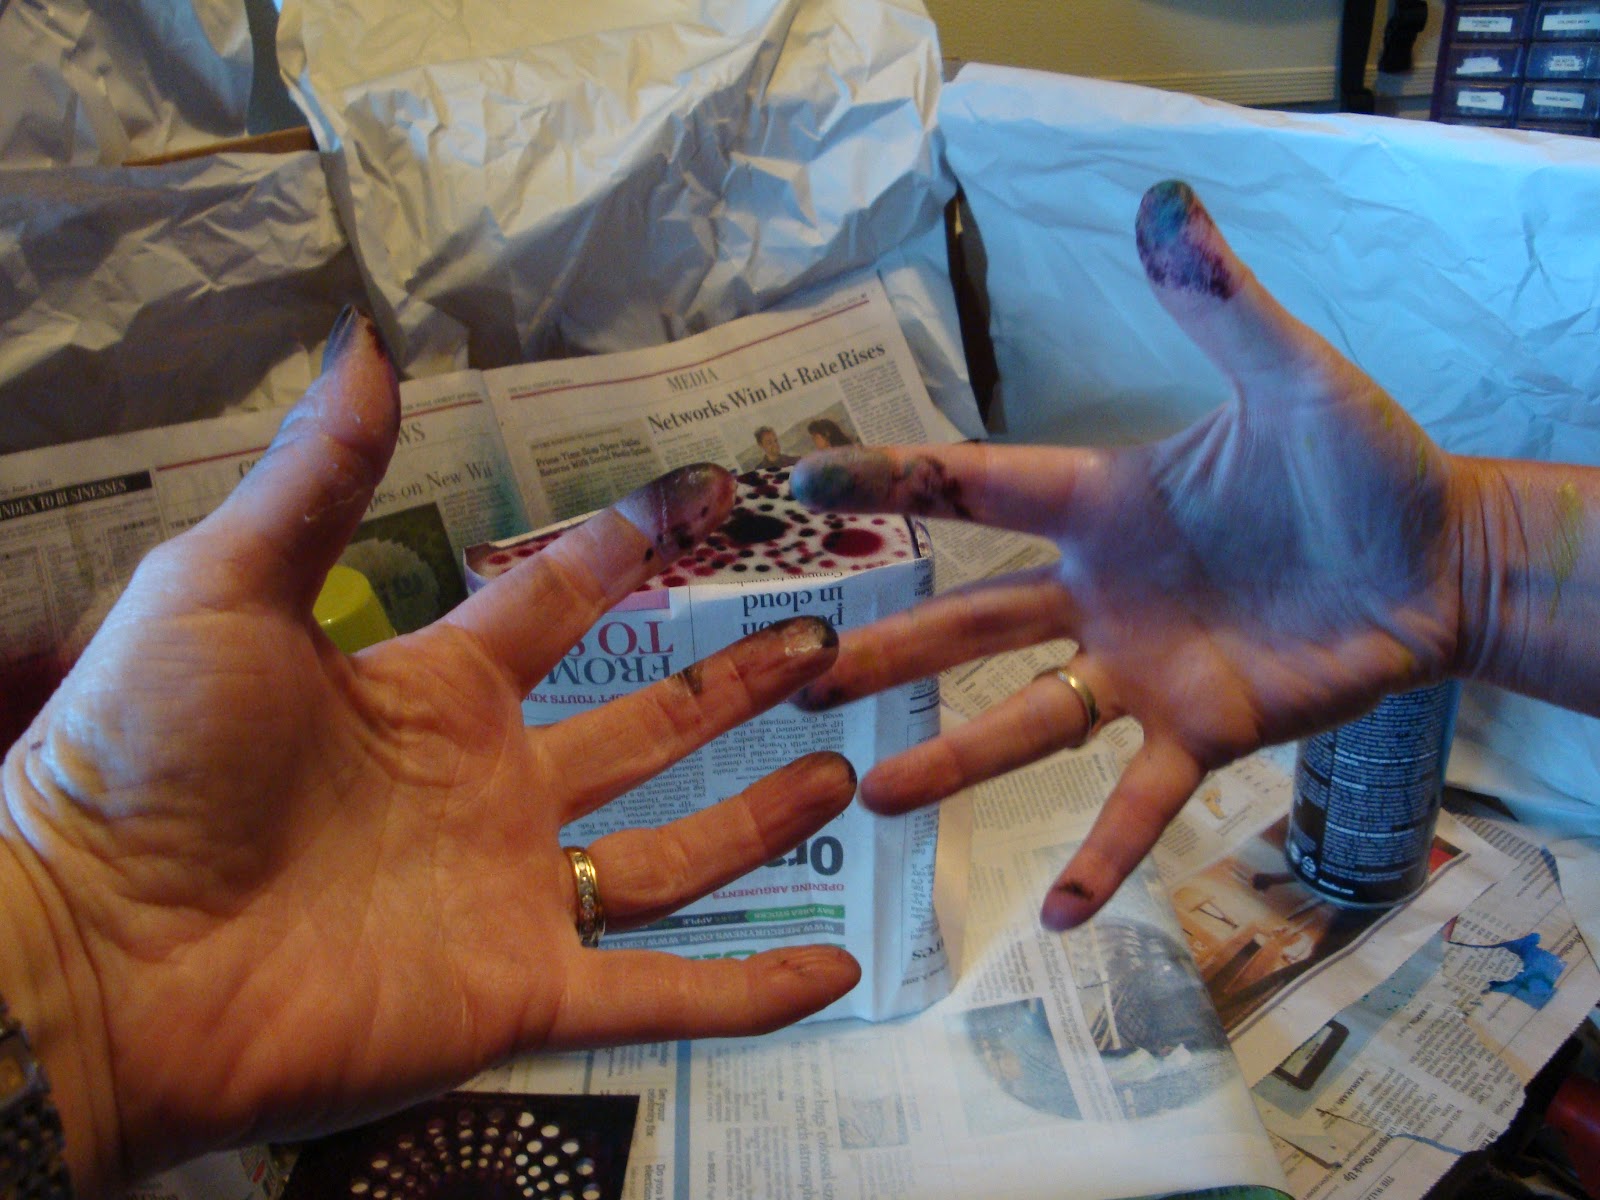
Note to self - next time wear gloves! The angle of the photo makes my hand look enormous next to Nancy's! For photos of Nancy's project: Squirrely Art. She may be posting her projects in the next day or so. For information on Maryjo McGraw and her secret blog:MaryjoMcGraw.blogspot.com.
First, I sprayed a clear desktop sorter with white spray paint. I did 2 light coats. I also sprayed a plastic tumbler that I use for water for paint brushes.
I really love this stencil and thought I would use it on my plastic pieces. Using painter's tape and newspaper, I masked off the portions I did not want to stencil. I used a red "stained glass" effect spray paint that Nancy brought over. I used the same stencil and paint color on my tumbler.
I added a few sprays of black paint as well. The photo above captures our home made spray booth and materials we used. My desk sorter is standing on end after being sprayed.
Note to self - next time wear gloves! The angle of the photo makes my hand look enormous next to Nancy's! For photos of Nancy's project: Squirrely Art. She may be posting her projects in the next day or so. For information on Maryjo McGraw and her secret blog:MaryjoMcGraw.blogspot.com.
Tuesday, May 22, 2012
Tuesday's Tip
Get more from your tools by using them in on-traditional ways. I love using stencils on a variety of projects, In addition to using them with inks, sprays, paints, Gelatos etc, I like to stamp through them. It adds a little extra texture to your image or background!
Labels:
Craft sprays,
Inks,
paint,
Rubber stamps,
Stamping,
Stencils,
tips
Saturday, April 21, 2012
Squirrely Challenge
The current Squirrely Challenge from Nancy is from the latest Technique Junkies Newsletter. The technique she chose is cascading images:
I chose one of the images as a starting point, masking and stamping the other images. I made this second card as a sample for my upcoming Stencils class:
The little square opens to a little image of a flower and mini butterfly. You can find more examples of this technique at Squirrely Art.
I chose one of the images as a starting point, masking and stamping the other images. I made this second card as a sample for my upcoming Stencils class:
The little square opens to a little image of a flower and mini butterfly. You can find more examples of this technique at Squirrely Art.
Monday, April 2, 2012
Stencils 101
Tuesday, April 3rd is my first basic class at A Work of Heart: Stencils 101. We will be using a couple of stencils and creating 2 cards to take home.
Here's a sneak at one of the cards. So, come on by and try your hand at stenciling and stamping!
Thursday, March 8, 2012
FInally Done
A while back, I took a free on-line class at Strathmore. I started a couple of background pages but was sidelined with real life and injury. I have finally finished it. Not sure how happy I am about it. I lost my original thought as to how the pages would go. Here's the link to the original post on January 7th. Below is the final product:
I decided I wanted to go with primitive and circular flowers. I happen to have several dies for flowers, but like this idea better. The background butterflies were stamped with Adirondak ink and Claudine Helmuth's paints. The die cut was sponged with a couple of colors of Adirondak blues. The stamps used were all Club Scrap. Now, I can send my journal onto my friend, Kate, with whom I am doing a journal exchange.
Saturday, February 4, 2012
New Line from Ranger
Ranger has picked up the Dyllusions line from the UK. I remember seeing advertisements for Dyan's stamps, sprays and paints in the UK stamp magazine "Stamp It". No paints at this point, but there are a set of very brightly colored sprays, rubber stamps (by Stamper's Anonymous) and stencils (made by Crafter's Workshop).
Took a photo of the sample display - I think the artwork looks a lot like Teesha Moore's work:
I must say, I like the bright non-sparkly colors of the sprays. I was able to try them out at the Crafter's Workshop booth and they spray wonderfully. Fairly fine mist, no huge blobs and no clogs (like another brand). I have been using Crafter's Workshop stencils for years - and love the new designs (as well as some of the stamps).
Took a photo of the sample display - I think the artwork looks a lot like Teesha Moore's work:
I must say, I like the bright non-sparkly colors of the sprays. I was able to try them out at the Crafter's Workshop booth and they spray wonderfully. Fairly fine mist, no huge blobs and no clogs (like another brand). I have been using Crafter's Workshop stencils for years - and love the new designs (as well as some of the stamps).
Saturday, January 7, 2012
Background Play
I posted previously about a couple of on-line tutorials to jump start your creativity. One of which is the Strathmore Paper on-line classes. The current one is by Traci Bautista and cover background and doodling techniques. So, I thought I would give it a whirl, especially since it is free. I am working in a journal and not on a sheet of paper. For the pages below, I picked a couple of stencils and masks and set them randomly on the journal pages. I chose to use Shimmering Rain sprays as my first layer:
As you can see, just a random background. I let it dry and added a couple of different stencil and used a couple of stronger Smooch Spritz sprays:
I like the depth so far, so I think I will stop with the sprays. my next step will be to add some acrylic paint accents. I am thinking of adding in some blues/teals...
As you can see, just a random background. I let it dry and added a couple of different stencil and used a couple of stronger Smooch Spritz sprays:
I like the depth so far, so I think I will stop with the sprays. my next step will be to add some acrylic paint accents. I am thinking of adding in some blues/teals...
Friday, December 9, 2011
HM Transparency
Last month, I was in Boston visiting my daughter. The weather was great and the Common and Garden were in full Fall foliage. While she was busy with classes, meetings,etc, I would wander about taking photographs. I thought some of the pictures would make a great Fall journal page. After inking, stencilling, and spraying mists, I had to decide which photo(s) and what sizes. Since I like the idea of color peaking through, I printed the photos on plain, inkjet transparencies and cut them to size. They turned out fairly clear considering I do not have a transparency mode on my printer. It also started my thinking it would be fun to print up a bunch of different photos on transparency to use in journals and collage. Have you printed your own transparency? Give it try!
Sunday, October 16, 2011
A New Journal
I have entered into a journal exchange with someone I met at a Kelly Kilmer class. Kate and I were chatting about exchanges - she had some bad luck in swap recently. It had been awhile since I participated in an art journal exchange, so I suggested we give it a try. Our first pages were to tell a bit about ourselves. I am not a writer. I do not diary/journal like that. I do use visual imagery. Sometimes, I add words or quotes. That is the closest I get to writing. So, of course, I went the visual route with my exchange page. The first page:
This page represents how most people probably see me. My family is a big part of my life - particularly since I retired from my profession when we began relocating with my husband's company. The page opens to:
This is my inner little devil - the one who loves the quirky, the odd, the dark....
This page represents how most people probably see me. My family is a big part of my life - particularly since I retired from my profession when we began relocating with my husband's company. The page opens to:
This is my inner little devil - the one who loves the quirky, the odd, the dark....
Wednesday, July 27, 2011
MIA
Yes, I am still around - just missing in action. Real life became oh so busy - a couple of days in San Francisco for "Billy Elliot"(fantastic show), SFMOMA for the Stein exhibit (excellent) and a lot of time with friends and family. As much as I have been enjoying myself, I have felt guilty to have let my blog posts lapse. I have been busy with creating, and I will share some of the things going on.
This coming Sunday, July 31st, I will be teaching a beginning Scrapbook class at A Work of Heart. This will class will be re-vamped in the future since the 6 page ALSB kits will no longer be available. The kit I will be using is Calypso:
I will also be teaching another card class using Distress Stains and Stencils. I changed it up a bit after my June class. The card stock is from the Welcome kit:
This coming Sunday, July 31st, I will be teaching a beginning Scrapbook class at A Work of Heart. This will class will be re-vamped in the future since the 6 page ALSB kits will no longer be available. The kit I will be using is Calypso:
I will also be teaching another card class using Distress Stains and Stencils. I changed it up a bit after my June class. The card stock is from the Welcome kit:
Thursday, July 7, 2011
A Little Journal Page
I was going through some magazines, pulling out information and tossing the rest. I came across a card with circles and butterflies. Pretty simple - so it came to mind to do a journal page. I love being able to take ideas from one medium to another. I had a partially completed page next to a blank and thought I would use the blank side. Well...it ended up a bit different than I originally planned. And, it became a 2 page layout.
Below is the left side - I added the circles, saying and flower cut out today:
The image below is the right side that I completed today. I used watercolor crayons and stencils on the background. I stamped the circles with Distress Inks. The images are from Helga Strauss (the Art Chick) - they were in a Stampington publication.
And, the two pages together:
Both pages came together quickly. What have you used for inspiration?
Below is the left side - I added the circles, saying and flower cut out today:
The image below is the right side that I completed today. I used watercolor crayons and stencils on the background. I stamped the circles with Distress Inks. The images are from Helga Strauss (the Art Chick) - they were in a Stampington publication.
And, the two pages together:
Both pages came together quickly. What have you used for inspiration?
Tuesday, July 5, 2011
Tuesday's Tip
I have been busy with stencils lately. Most of the stencils I use I have bought from companies like Club Scrap and Crafter's Companion. However, packaging can also act as a stencil. The packages from chip board letters and shapes can act as a stencil. You can use the negative space to draw through. The negatives from punched papers can also be used!
Subscribe to:
Posts (Atom)