Showing posts with label Distress Inks. Show all posts
Showing posts with label Distress Inks. Show all posts
Tuesday, January 15, 2013
Tuesday's Tag
Tuesday's tag was a throw back to my scenic stamping days (albeit much more simply done). I stamped a Hero Arts chevron/snowflakes background in Versa Mark ink. After it was dry, I added a few colors of blue Distress Inks. The trees and deer came next:
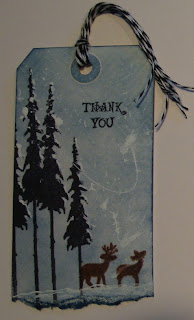 I used white acrylic paint to add some snow to the trees and ground. I flicked a bit more paint on the background. Lastly, I added a Stampin' Up sentiment and baker's twine (that I didn't have to make!) Trees are by Stamper's Anonymous/Tim Holtz and the deer are CTMH (Close to my Heart).


Monday, January 14, 2013
Journaling
It has been awhile since I did anything creative. The holidays, family, and mom's trust business have taken up my time. I did get a few minutes recently to work on journal pages for a swap. With all the travel over the past months, this is what came to mind:
 Now, this is a fairly simple page for me. I did a bit of layering of mists and inks on the background. I stamped a new Unity cloud background to add some interest. Of course, I needed to add a bit of a twist, so I added a heart from Rubber Baby Buggy Bumpers...
 The house stamp is from Hero Arts -it's one that I have frequently used!


Thursday, August 16, 2012
Squirrely Challenge Part 2
I had another idea for the Squirrely Challenge. I originally thought I would use darker, more masculine colors, but just went with the flow:
 The pearl was white, but I colored it with a Copic marker. The background was colored with Distress Inks. The stamp is from Club Scrap.

Wednesday, June 20, 2012
Watercolor Mailer
As I mentioned during my "spray paint period", I have been following Maryjo Mcgraw's "secret blog". The next project was a watercolor mailer. I did not have the exact same size of watercolor paper, but was able to make this smaller size work. I thought I would go with a theme when picking colors and stamps. Below is the front side:
 I was impatient for the colors to dry - so they mixed a bit more than Maryjo's example. I used Distress markers and the brush less watercolor technique to add the images.
This is the back side of the mailer:
 As you can see - land and sea was the theme! Images were stamped using the same technique as the front side. Stamps from Stampin' Up, Club Scrap, Artistic Outpost, Memory Box, and Printworks.

This is the back side of the mailer:

Monday, June 4, 2012
Playing with Distress
Life has been getting in the way of my creative time these days. I did have a bit time, so I grabbed some tags and reviewed some Distress techniques.


Distress ink was applied to the tag and water drops flicked on the inks. I used a heat gun to dry.

A little "wrinkle-free" Distress used on this tag. I love this little rabbit (Stampers Anonymous/Tim Holtz).

The "brushless watercolor" technique was used on the watercolor paper. Stamps are from Stampin' Up.
Wednesday, May 23, 2012
Squirrely Challenge
This time our Squirrely Challenge is Colorful Silhouettes. it is from the August 2011 Technique Junkies Newsletter. After white embossing a panel, I added several blue tones of Distress Inks. The bird from Impression Obsession was back embossed. The result:
 I repeated the white embossed Stampin' Up background on the white card base.The label was stamped and punched, with color added from Distress inks. I used a Ranger nib dipped onto the ink pad to color the label.
For links to other Squirrely Girls, visit Nancy's blog.

For links to other Squirrely Girls, visit Nancy's blog.
Saturday, April 7, 2012
Squirrely Challenge
For those who have not heard about this: A group of friends and I try different techniques for cards, tags, ATC's, etc. It was started by my friend Nancy (Squirrely Art) and has slowly grown.
Since many of us took an on-line class (Tim Holtz Creative Chemistry), Nancy pulled the "blended spritz and flick" technique with Distress Inks as our challenge. Since most of the art I have seen made with Ranger/Tim Holtz projects has been grungy, I thought I would use a more traditional, somewhat cute (at least for me!) stamp set.
 I used several green and blue shades of Distress ink and splattered water drops. The stamp set is from Stephanie Barnard's Stamps Of Life line. I stamped the sentiment in Distress Faded Jeans and black, a little off set. You can see other interpretations of this technique by clicking on the Squirrely Art link in parenthesis above.
Since many of us took an on-line class (Tim Holtz Creative Chemistry), Nancy pulled the "blended spritz and flick" technique with Distress Inks as our challenge. Since most of the art I have seen made with Ranger/Tim Holtz projects has been grungy, I thought I would use a more traditional, somewhat cute (at least for me!) stamp set.

Thursday, March 29, 2012
She...
Finally completed my art journal pages for the swap in which I am participating. I sort of had a vision of rainy days as a theme since we are experiencing our winter rains now. Since I just unpacked some new sprays, I thought now was as good a time as any to play. I did not give it much thought, and just started spraying, stenciling, painting the pages. I used a combination of Glimmer Mist, Smooch, and Dylusions. Love the Dylusions sprays - bright, transparent and reacts with water for some neat effects!
After the pages were dry, I went in with rubber stamps and inks and added some more texture and images. Finally, pulled out the images for the final layer.
 It did not turn into the vague idea I had in my head. I actually like it better - and changed the theme somewhat. The page started with strips of old book and music book pages. I added some details with Faber Castel Pitt Big Brush markers. The word stamp is from Unity.
After the pages were dry, I went in with rubber stamps and inks and added some more texture and images. Finally, pulled out the images for the final layer.

Sunday, March 25, 2012
Brushless Watercolor
Club Scrap's Pro Scrapbooking League, winter edition, has been going on these past 6 weeks. Today is (thankfully) the last day. You can tell when I am participating - that is when you will see the few scrapbook pages I post (or parts of pages). I am so glad this will be over for many reasons. But this week we had to follow any of 6 posted sketches...for a week...so, yes I am done.

Today, I made cards using Ranger's (and Tim's) Brushless Watercolor technique. I originally remember using this technique several year ago with Adirondak Ink pads. This time, I used 3 colors of Distress Ink (Rusty Hinge, Honey, and Forest Moss) on a Club Scrap stamp:

After inking the stamp, you spritz it with water and then stamp. The results are slightly different every time. Since Distress was formulated to react with water, it blends much easier than the Adirondak Inks.
Thursday, March 22, 2012
Chipboard Letters
So, have you ever forgotten some of the items that you have, um, bought? I have been doing a bit of cleaning out and re-organizing and found a large quantity of chipboard letters I bought at an extreme discount. So. since I was scrapbooking (for a change!), I decided to use them for titles.

For the above title, I used the Picket Fence Distress Stain and covered the front of the letters. Once it was dry, I stamped small snowflakes in Distress Ink (Tumbled Glass, I think).
 For this title, I used Tattered Rose as my base, and stamped leaves in Pine Needles and Persimmon. Super easy - and I am using up my stash!


Sunday, March 4, 2012
Squirrely Challenge
Last year, some friends and I have been participating in our own technique challenge. My friend, Nancy, put together several challenges using Technique Junkies newsletter. We have been on hiatus until recently. For this challenge, we used the layered masking technique in the most recent newsletter. I made a couple of different cards:
 I used Distress inks for the background color (Spun Sugar, Worn Lipstick and Festive Berries). The stamps are from Stampin' Up (background script) and Club Scrap. I changed the orientation for this second card:
 Same Distress ink colors as the first card. Stamps are Stampin' up. Check out Nancy's Blog - she has the links to all the "Squirrel Girls"!


Saturday, December 24, 2011
Christmas Cards

Saturday, December 17, 2011
Tag, You're It

Thursday, December 15, 2011
Tag Team
I have busy working on Christmas art - cards and tags, specifically! The cards are almost done and I am in desperate need to gift tags (especially since I need to get several packages in the mail!) I guess you can figure out what I will be doing today!
Earlier this week, a couple of my friends and I had our annual Christmas lunch and gift exchange. We call it "Christmakkah" - it was so christened many years before the TV show (The OC?) ever used it. I made a couple of tags early for Nancy and Tracy.
 For this tag, I gathered together some small Christmas images and made my own Holiday collage. The background was colored with Distress Inks. The little charm is actually a green plastic disc game piece. The mini tree was stamped, the disc glued to the image and the then trimmed. I added foil tape around the edges. With all the fervor over Tim tags and his collage background, I thought I would make my own and save a few bucks! The greeting was stamped on a die cut ticket.
Earlier this week, a couple of my friends and I had our annual Christmas lunch and gift exchange. We call it "Christmakkah" - it was so christened many years before the TV show (The OC?) ever used it. I made a couple of tags early for Nancy and Tracy.

Monday, December 12, 2011
In Process...

Friday, December 9, 2011
HM Transparency

Thursday, July 7, 2011
A Little Journal Page
I was going through some magazines, pulling out information and tossing the rest. I came across a card with circles and butterflies. Pretty simple - so it came to mind to do a journal page. I love being able to take ideas from one medium to another. I had a partially completed page next to a blank and thought I would use the blank side. Well...it ended up a bit different than I originally planned. And, it became a 2 page layout.
Below is the left side - I added the circles, saying and flower cut out today:
![]() The image below is the right side that I completed today. I used watercolor crayons and stencils on the background. I stamped the circles with Distress Inks. The images are from Helga Strauss (the Art Chick) - they were in a Stampington publication.
![]() And, the two pages together:
![]() Both pages came together quickly. What have you used for inspiration?
Below is the left side - I added the circles, saying and flower cut out today:


Thursday, April 7, 2011
Distress Stains
I admit it - I was quite enamoured of the Distress Stains from Ranger. Tim Holtz demonstrated their uses at CHA, which was filmed. I did not want to like them, but I did, So, I found the Stains at a great price and had them shipped. I decided to try a few different techniques.
I picked 4 colors and just applied them to card and 8 1/2 x 11 inch piece of card stock. There was nothing special about the card stock, I just scribbled/swirled them on. They soaked right into the paper, so blending was out of the questions. I did soften some edges with matching Distress Inks and a sponge applicator. The parent sheet was the cut up and used a card backgrounds.
 This card was made with part of the sheet. The colors are much more vibrant in person. I wanted to keep the card fairly simple since there was so much color going on in the background. Below is another card made from the same parent sheet:

I picked 4 colors and just applied them to card and 8 1/2 x 11 inch piece of card stock. There was nothing special about the card stock, I just scribbled/swirled them on. They soaked right into the paper, so blending was out of the questions. I did soften some edges with matching Distress Inks and a sponge applicator. The parent sheet was the cut up and used a card backgrounds.


Once again, I kept the card fairly simple, adding a punched border on which I sponged Distress Ink. In my next post, I will show another way in which I used the Stains. I must say that they are very fun. You really do not "need" all 12 colors - but they sure are nice!
Sunday, December 5, 2010
Day 2 of Tim's Tags

The tag background has several layers, showing a lot of depth. I think that following along and making these tags is a great way to get comfortable with layering. Look through your stamps for design element images - they work wonderfully to add depth without adding a lot of bulk.
Saturday, December 4, 2010
12 Tags of Christmas

Part of the fun for me is to come up with a similar tag, even when I am not using Tim Holtz products. For the above, Day 1 tag, I actually used the Heritage Cricut cartridge to cut out the house and fence. For the small wreath on the fence, I dyed white Flower Soft with a green dye based re-inker. I used card stock, as opposed to Grunge board. I do have the majority of Distress Inks, and I used a variety of rubber stamps. How many of you are playing along? It is a great way to refresh your Distress Ink skills - and helps you think a bit outside the box (as far as substitutions).
Subscribe to:
Posts (Atom)