Tuesday, November 30, 2010
Tuesday's Tip


Sunday, November 28, 2010
More Background Fun

The above panels were the result of pigment and dye ink resists. The motif was stamped in hybrid pigment inks (matte and pearlized) and allowed to dry for a minute or two. Once dry, I brayered dye ink over the top (I used Ranger Adirondack Cranberry). I lightly buffed over the areas of pigment ink. I think this is a great background for holiday cards or tags. Give this a try - quick and simple, and easy to incorporate into your Christmas/Holiday cards.
Wednesday, November 24, 2010
Painted Backgrounds


Have you made time for play yet? Get those creative juices flowing and create some panels of your own. Then, when you need to make a card (and do not have a ready made stash), you can pull out a panel and you are half way to completion.
Tuesday, November 23, 2010
Tuesday's Tip
Given all of my inky play, I find I have very inky fingers! Some inks tend to have more staying power on my hands than others. I find that using a barrier cream (when I remember!), such as Invisible Care, makes clean up easier and more efficient. Washing with a pumice or "lava" soap or using Purel will also get fingers/hands fairly clean. Remember that Purel has alcohol and can dry out your skin. After playtime and clean up, use a good hand lotion.
Saturday, November 20, 2010
Backgrounds for Cards


For the above card, I cut one of my prepared panels to create the central image. I stamped the image in light chalk ink and in Microglaze. I then brayer a darker ink over the top and allowed it to dry. Using chalk inks in this way, really shows the depth of field that can be created fairly quickly. Do you have chalk ink? If so, start playing around stamping it onto matte coat paper, and layer other chalk inks over it. You may be surprised!
Thursday, November 18, 2010
Ink and Microglaze


Playing with inks and materials helps fuel creativity, particularly when you do not have a specific goal in mind. Chalk inks are great to apply direct-to-paper as they are the one ink that resists itself. The variety of layering effects and very interesting. Throw in some mica and dye inks and you will get a variety of depth's and textures. The panels I made will be cut up and used for cards. As I post, I will let you know what I did to make the background. If you are further intrigued, visit Mary Jo's blog (see my side bar of blogs I follow). She has a variety of uses for Microglaze, as well as Diamond Glaze. Then, get out your re-inkers and ink pads and make some discoveries for yourself!
Tuesday, November 16, 2010
Tuesday's Tip
In my post on November 12th, I used Flower Soft as moss for the embossed tree (here). It comes in a variety of colors and color combinations. Did you know that you can change the color by adding dye re-inkers? I used an Autumn mix and added a drip or two of Olive Green re-inker. I liked that the different colors in the mix (yellow, orange, rust) absorbed the dye re-inker differently. Thus, there was an interesting variation to the Flower Soft. If you do not have the exact color you need, get out your re-inkers and make your own!
Sunday, November 14, 2010
Original Rubber Stamp Convention
I have been in So California for the past 3 days - doing a variety of things. I did meet a friend and spend the day at the Original Rubber Stamp Convention in Carson, Ca. It has shrunk significantly since I first started traveling down back in the early 2000's. However, there were some fun booths to check out and old friends with whom to catch up. A few interesting tidbits:
- Judikins is always coming up with fun designs and new items. I spent a large amount of time in this booth, mainly visiting with Mary Jo (McGraw) and Judi's parents! However, for you clay aficionado's, they have rubber plates that you can sent through your pasta machine with polymer clay, adding design and texture. The item is called a "Clay Squisher" and is in the current on-line catalog.
- One sad note was that Stamp Luis Obispo had to close their store. You will know them as Studio's Blackbird/Invoke Arts. Building retrofits and landlord issues came into play. You can still order stamps and items here.
- Stamper's Anonymous was all about Tim. He was demo-ing his new Vagabond machine, dies and other products. He was also using the new color washes and Perfect Pearl's mists. The mists are colored mica mists similar to Glimmer Mist and Radiant Rain product. The colors can be found at the Ranger Ink website. Check out Tim's blog for some samples.
I will be heading home Monday evening. But first I will be spending the earlier part of the day with Mary Jo McGraw at the Judikins warehouse taking a couple of workshops. Check out some of the website's mentioned above - they have wonderful galleries (and some tutorials) that are sure to get the creativity sparked!
- Judikins is always coming up with fun designs and new items. I spent a large amount of time in this booth, mainly visiting with Mary Jo (McGraw) and Judi's parents! However, for you clay aficionado's, they have rubber plates that you can sent through your pasta machine with polymer clay, adding design and texture. The item is called a "Clay Squisher" and is in the current on-line catalog.
- One sad note was that Stamp Luis Obispo had to close their store. You will know them as Studio's Blackbird/Invoke Arts. Building retrofits and landlord issues came into play. You can still order stamps and items here.
- Stamper's Anonymous was all about Tim. He was demo-ing his new Vagabond machine, dies and other products. He was also using the new color washes and Perfect Pearl's mists. The mists are colored mica mists similar to Glimmer Mist and Radiant Rain product. The colors can be found at the Ranger Ink website. Check out Tim's blog for some samples.
I will be heading home Monday evening. But first I will be spending the earlier part of the day with Mary Jo McGraw at the Judikins warehouse taking a couple of workshops. Check out some of the website's mentioned above - they have wonderful galleries (and some tutorials) that are sure to get the creativity sparked!
Friday, November 12, 2010
New Embossing Folder

After embossing the brown panel, I rubbed white ink and several Distress inks over the raised portions of the image. The color variations in the photo are as dramatic in the photo. I thought it would be fun to punch a hole in the bark and have a feathered friend peek out. I colored the owl with Copic markers, but left the eyes white to pop out at the recipient. I felt that the front needed a little something, but I did not want to ruin the tree texture by adding a sentiment. I used Flower Soft in spots to mimic moss/fungus on the trunk.
Do you use embossing folders? What is your favorite to use?
Thursday, November 11, 2010
Decorative Tape and Stamp Positioner Usage

The center image was stamped with white ink onto black card stock. Once it was dry, I completely filled in the image with white gesso. This was a technique we did at Club Scrap's Retreat. It is similar to techniques we did years ago with colored pencils. After the gesso has dried, stamp the image again, using a stamp positioner, in black ink. Using acrylic paints, paint the image. Once the paints have dried, over stamp the image again in black ink, using the stamp positioner for placement. The image can be stamped several times depending upon how dark you would like the image.
Decorative tapes come in a variety of colors and images, making it easy to mix and match with your stamps and techniques. Have you tried using a stamp positioner? What is your favorite technique?
Tuesday, November 9, 2010
Tuesday"s Tip
I have been playing a lot with Tattered Angels products. I really wanted to find the spectrum of uses so I had other options than just spraying/painting. One of the frustrations with Glimmer Mists, besides the clogging of the sprayer, is mixing the liquid and the mica that tends to settle.
We have learned, some of us the hard way, that you should shake/roll the bottle from side to side. We have learned that this take a long time to mix. Enter a small item that is actually used in Metallic Mixatives from Ranger's Alcohol ink line: a BB! I read about this and added a couple to my Glimmer Mists - works so much better! I have since been adding them to my own mixes of ink and mica powders, as well as to Radiant Rain. This is an easy, less frustrating way to make your sprays user friendly!
We have learned, some of us the hard way, that you should shake/roll the bottle from side to side. We have learned that this take a long time to mix. Enter a small item that is actually used in Metallic Mixatives from Ranger's Alcohol ink line: a BB! I read about this and added a couple to my Glimmer Mists - works so much better! I have since been adding them to my own mixes of ink and mica powders, as well as to Radiant Rain. This is an easy, less frustrating way to make your sprays user friendly!
Sunday, November 7, 2010
Glimmer Glaze Resist

I decided to try stamping with Glimmer Glaze. I painted a couple of colors directly on the above Club Scrap stamp. I then stamped it onto matte coat card stock. I let it dry naturally. Then, once dry, I decided to that I really needed a colored background...so, what the heck, I will spray on a couple of colors of Glimmer Mist. After spraying, I blotted the image and found that the Glimmer Glaze resisted the Glimmer Mist. The original Glaze colors were not muddied by the Mist.
The panel was then trimmed and mounted onto color card stocks. For the corners of the image panel, I wrapped Washi tape around them to mimic photo corners. (BTW- Ginko Papers, where I have purchased many of my decorative tapes has some great new colors and images, just in time for the holidays!)
What discoveries have you made in the hopes of finding interesting uses for products? Start playing - and please let me know!
Friday, November 5, 2010
Washi tape

I have previously posted journal photos with decorative tape. I thought I would make up some cards using tape. For the card above, I used 3 complimentary tapes to form the horizontal stripes on the black panel. The stamps and card stocks are by Club Scrap. Next time you see some decorative, pick up a roll or two and try something new.
Thursday, November 4, 2010
Cards and Card Portfolio


With the Holidays coming soon, this would make a great gift. The cards could have sentiments stamped or just leave them blank.
Tuesday, November 2, 2010
Tuesday's Tip
In several past Tuesday's Tips, I discussed inking tool for Distress Inks, Glimmer Mists, dye inks, etc. Many of these tools incorporate Ranger's Cut and Dry foam. This is a wonderful material that you can cut to the desired size to use with the Ranger/Tim Holtz inking tool, or to make your own ink pads. Like the handy circular sponging tool in the previous post, you can throw these into your washing machine. I will use my cut and dry foam for a while, and then wash the lot of them in a lingerie bag (keeps track of the smaller pieces). They may be stained, but they will not transfer inks after washing!
Monday, November 1, 2010
Faux Postage
Here is a "blast from the Past" - Faux Postage. As a stamper, I remember when this trend was quite popular several years ago, along with mail art. So, I was no stranger to this Retreat project. (I still have some postage sheets of various sizes and orientations in my stash).
 Using one of the postage sheets from 100 Proof Press, we masked off the rectangles and sponged with ink. I did this during the class at Retreat, so my colors of ink were somewhat limited. At home, I worked quickly, grabbing a variety of Club Scrap wood mounted stamps to fill in the rectangles. The project did come with a matte and frame - although I may make a slightly different version to frame in my studio.
 We used these handy dandy sponges to sponge on the inks. I absolutely love these! They fit great in your hand given the ergonomic handles. I actually like these so much better than the handles I have used for Distress Inks. Plus, you can toss the entire sponge in the washing machine! I tossed the used sponge in with some towels and it held up just fine. I think I will be using these for my Distress Inks as well.


Saturday, October 30, 2010
Back in Action
It has been a while since I have been in the studio. With traveling (Retreat and Parent's Weekend in Boston) and a killer cold, I just have not felt much like doing anything. Thankfully, I am starting to feel better and was finishing some Retreat projects today.

 This was a fun and easy project named the "photo Butler". The name commemorates the inspiration - my friend, Pam Butler, who found a similar album at Target. She sent it off the Club Scrap headquarters, thinking that someone could find a way to create something similar. And, Kay did!
It is basically a large pop-up album with 6 pages with different levels and orientations for photos. One of the examples had the opening as a door, with a hinge and tab to be opened. I love that idea and will probably make another one using that idea. This project would make an excellent Christmas present.


It is basically a large pop-up album with 6 pages with different levels and orientations for photos. One of the examples had the opening as a door, with a hinge and tab to be opened. I love that idea and will probably make another one using that idea. This project would make an excellent Christmas present.
Tuesday, October 26, 2010
Tuesday's Tip
There you are in the midst of a creative maelstrom - supplies covering most of your work area. As you reach for your brads or eyelets, your hand is knocked by your stack of materials. Brads or eyelets end up all over your work area and, more than likely, on the floor/carpet.
Sound familiar? Trying to pick up little bits can be a real pain. I read this great tip from the October issue of VampStampNews: Use a magnet! Pat Smith submitted this idea and it sounded like it worked wonderfully. Give it a try - I know I will!
Sound familiar? Trying to pick up little bits can be a real pain. I read this great tip from the October issue of VampStampNews: Use a magnet! Pat Smith submitted this idea and it sounded like it worked wonderfully. Give it a try - I know I will!
Tuesday, October 19, 2010
Tuesday's Tip
Those who love all things "Tim" (ie Tim Holtz) will have plenty of Distress ink applicator tools. These consist of wood handle and changeable rectangles of Cut and Dry foam. Not only are they great for Distress ink, but you can use them with other art mediums. I took a class from the founder of Tattered Angels and we used the applicator tools with Glimmer Mists and other paints. They work great for easy spreading of paints and give a different textural effect.
Friday, October 15, 2010
Just Playing
Since I have returned from Club Scrap's Retreat, I have been very uncreative. It seems we all shared more than ideas, and I have bit of a flu. Thanks to Dayquil, I am feeling a bit better today. So, I ended up at my desk trying to decide what to make. Then it occurred to - I rarely play, as I am usually looking to make something to share. Well, today, I have no finished project. But I did get out my stamp positioner and stamp.
Without giving anything away, we did use a new tool at Retreat - the Position-It. Think of a Scor-board that is a stamp positioner. It can be seen at Stamp A Mania's site. Just enter Position It into the search window. I must say it is a pretty nifty tool. But I have my acrylic T square and panel and they work fine. I stamped in various colors and used colored pencils and paints to add color. Then, I went back to the original image and re-stamped using my stamp positioner. Nothing special..no photos...just playing...
Without giving anything away, we did use a new tool at Retreat - the Position-It. Think of a Scor-board that is a stamp positioner. It can be seen at Stamp A Mania's site. Just enter Position It into the search window. I must say it is a pretty nifty tool. But I have my acrylic T square and panel and they work fine. I stamped in various colors and used colored pencils and paints to add color. Then, I went back to the original image and re-stamped using my stamp positioner. Nothing special..no photos...just playing...
Tuesday, October 12, 2010
Tuesday's Tip
This week's tip is not new, but it is a good one that bears repeating. I have been at Club Scrap Retreat making a variety of goodies, but also talking technique, supplies, etc. During lunch one day, several of us were discussing paper cutters and the dulling effects of some materials. Although some cutters are self-sharpening, they do need occasional help. Cutting aluminum foil several times helps keep the edge on the blade. I usually tear off a few inches from a roll, and cut through it several times. Since foil is pretty thin, you may need to fold it in half until you get the hang of cutting it.
Sunday, October 10, 2010
Halloween

I used white ink to bring out the embossed spider web pattern. Dab your sponge in white ink and gently rub it across the raised portion of the embossed image. A fun and easy background.
Friday, October 8, 2010
Retreat

This is my first time at this Retreat, although I have been to others. It is always a great opportunity to try a new techniques, learn new ways of doing old techniques, and talking with other artists and crafters. As much as I would love to showcase a couple of new ideas, I must wait a week since others have ordered "Retreat in a Box" and I can not spoil the surprise. I will tell you that I learned a new way to use an old, tried and true tool. But, shh, you did not hear it from me!
Tuesday, October 5, 2010
Tuesday"s Tip
I have been using my Cricut quite a bit lately. It seems like it always goes in spurts - I will use it daily for awhile and then not at all. Since I have been completing swaps for Club Scrap's October Retreat, I have been using it almost daily. My cutting mat is starting to lose its stickiness. It is not so bad that I need to replace it, yet. How do you get a little more mileage from your mat? Spray the mat with Re-positional Adhesive spray (available at art and hobby stores). Works like a charm to get a little more mileage from your mat. Always remember to replace the acetate cover to keep dust and hair away.
Saturday, October 2, 2010
GAB Part 2

The GAB (Girls Altering Books) project was done last spring. I have bound my swap pages a while ago. I did make duplicates of my pages so that I could assemble them together. I am pleased to say that it is done. However, I have decided I really do not like the way the cover turned out.(Which is why it took me so long to decide whether or not to post it on the blog.) I usually would toss it out and start again...but I will live with it for now. I also sometimes forget that not everything you do must be perfect.... I do like the way the title turned out. It is difficult to see in the photo, but I went over the stamped letters with Ranger's Crackle Accents. It is a fun addition to "aged" projects...
Tuesday, September 28, 2010
Tuesday's Tip
A couple of days ago, I posted a "Thrinchie" which had a shrink plastic embellishment. I tend to add dimension to my projects - cards, scrapbook pages, altered books, etc. I feel it adds interest. I have used a lot of shrink plastic over the years. My favorite is Lucky Squirrel. Their product is very consist in how it shrinks. Plus, it has a good weight before shrinking, making it easy to stamp, color and cut with minimal possibility of tearing. My "tip" - always lightly sand both sides of the shrink plastic before you begin stamping. Sand horizontally and vertically, very lightly. It will give the plastic some "tooth" to hold inks or colored pencils. Most importantly, it will prevent the shrink plastic from sticking to itself when heated!
Monday, September 27, 2010
Twelve Days of Christmas

I know, I know - Christmas!? It is still September! I am not one for starting holiday activities early, but this year I did. I hosted a 12 Days of Christmas swap over the summer. We all made 12 identical pages of our day, and then met to bind them into a book. I have a collection of 12 Days books and thought a handmade version would be a great addition. The only restrictions were size (I provided the pages) and no nudity/vulgarity as I was to display mine during December. The artwork and variations on the theme were wonderful! So, I could not resist sharing these with all of you.


I do not know if you noticed, but the 6 Geese a layin' was a hand carved stamp for this swap. A variety of stamping, die cutting, embossing and "blinging" was used - and everyone went all out! Can you guess which
page is mine?
Sunday, September 26, 2010
Background Play
I had been thinking about making some different backgrounds to use in my art journal. Unfortunately, I really needed a card for our the woman who polices the section where we share Giants season tickets. We have been friendly for years - and my making her a card or small piece of art as a thank you has become a tradition.
This year, I settled on a card and decided to use one of my journal background techniques. For the background, I saved a couple of days of the Sports pages from our local newspaper. I tore them into small pieces/strips, piling them on my desk. I also tore some strips/pieces of a pattern paper that had the colors I wanted to use. Next, I began gluing paper and newsprint randomly, overlapping as I went along. Once the card stock was sufficiently covered, I set it aside to dry.
Once dry, I made a wash from Golden Glazes and painted it on. The Glaze helps pull the disparate images on the background together - unifying the background. The baseball image was stamped several times, allowing me to cut out and highlight various parts.
I apologize for the sideways image - for some reason the uploader refuses to cooperate.
 |
This year, I settled on a card and decided to use one of my journal background techniques. For the background, I saved a couple of days of the Sports pages from our local newspaper. I tore them into small pieces/strips, piling them on my desk. I also tore some strips/pieces of a pattern paper that had the colors I wanted to use. Next, I began gluing paper and newsprint randomly, overlapping as I went along. Once the card stock was sufficiently covered, I set it aside to dry.
Once dry, I made a wash from Golden Glazes and painted it on. The Glaze helps pull the disparate images on the background together - unifying the background. The baseball image was stamped several times, allowing me to cut out and highlight various parts.
I apologize for the sideways image - for some reason the uploader refuses to cooperate.
Thursday, September 23, 2010
Thrinchies

I also started on my thrinchies (3 x 3 's). I used Club Scraps' Gratitude red print as my base. The white glossy was painted with Glimmer Glaze. Once dry, I stamped the Destinations stamp on the prepared square. After re stamping, trimming and popping up the Tower of Pisa, I decided it needed a little something.
I stamped the wine glass image on shrink plastic. Before shrinking, I colored the image with Copic markers. They worked great on the shrink plastic - however, you must color on the opposite side of the stamped image. The alcohol ink will react with the permanent ink of the plastic.
I am very pleased to say i have completed my swaps! On to the next project.
Tuesday, September 21, 2010
Tuesday's Tip
This past weekend I was at an art retreat. I was using my time to put together scrapbook pages for Club Scrap's Retreat Friendship Swap. One of the embellishments I used was flowers. Luckily. I found the exact colors for which I was looking. But what if you do not?
There are flowers in different colors and sizes. (Prima is one of the most common manufacturers.) There are times I have wanted a particular shade of color that I could not find. So, I made a spray with ink pad re-inkers and water - and sprayed white flowers. Voila - the exact color I needed!
You can use pre-mixed sprays (Adirondack, Glimmer Mist, Radiant Rain, etc) or mix up your own.
There are flowers in different colors and sizes. (Prima is one of the most common manufacturers.) There are times I have wanted a particular shade of color that I could not find. So, I made a spray with ink pad re-inkers and water - and sprayed white flowers. Voila - the exact color I needed!
You can use pre-mixed sprays (Adirondack, Glimmer Mist, Radiant Rain, etc) or mix up your own.
Wednesday, September 15, 2010
Interesting Discovery

A little something to keep in mind while using gesso!
Tuesday, September 14, 2010
Tuesday's Tip
Seems I have been making a lot of floral cards lately. Do you go through phases in your art? To add variety to stamped and cloth flowers, I often use brads in the center. Given the variety of brads - solid colors, glitter, rhinestones - it is easy to personalize.
Sunday, September 12, 2010
Tinted Gesso

I was playing with re-inkers and gesso. I added Hot Pink re-inker to gesso and applied it to blue card stock. I then stamped into the gesso. A quick and easy background to any card. For the focal image, I colored the stamp with Tombow markers.
Card stock and stamps (other than the mini tag stamp and punch by Stampin' Up) are by Club Scrap.
Friday, September 10, 2010
Hardware

One of the past Tuesday's Tip centered around great finds at the hardware store. Sometimes, you only need to look as far as your husband's tool chest!
In making the card above, I created the treading background with a Cuttlebug embossing folder and gesso, as per Technique Junkies Sanded Gesso. I thought the addition of actual washers would be a fun embellishment over stamped ones. All stamps and card stock are by Club Scrap.
Thursday, September 9, 2010
What I have been doing

Have you gone through your supplies recently? How many items to save "just in case"? With the changing of the seasons( we had some rain yesterday in No Ca!), it is time to do some creative housecleaning and get ready for winter. I had too much "just in case" items. Not any more!
Tuesday, September 7, 2010
Tuesday's Tip


I have been absent from posting for awhile - though I have not been idle! Kids moving out and a bit of the flu had my attention. Everyone is settled and I am back to full health.
I have also been purging and reorganizing my studio. After having moved in about a year ago, it was time to make some changes and (really) clean up. I also was able to find a great product (courtesy of my friend, Diane) that has made all the difference in mobile and compact storage.
The top left photo is of drawer units I had been using to store embellishments (brads, charms, buttons, etc). I was also using bead boxes. I had 2 small drawer units as well as 9 bead boxes and I ran out of storage. My shelf was looking crowded and messy - plus, I would need to transfer embellishments to smaller containers to take to classes and crops. WELL - this was not really working.
The top right photo is of the Cropper Hopper Embellishment box. I LOVE THIS! I was able to condense all my (numerous) embellishments into a couple of cases. The bottom photo is of the open case (the mini boxes are sold separately). This has made a huge difference in portability and space.
BTW- I purchased my Embellishment cases at Beverly's Fabrics and Crafts - using a 40% off coupon.
Tuesday, August 31, 2010
Tuesday's Tip
I have been out of commission - life got in the way! I have successfully moved both kids into their dorms, and am recovering from a bit of the flu. I am anxious to get to doing some fun creating!
While laying low, I read the September edition of Vamp Stamp News. There was a great list of fun finds at the hardware store. It was a great reminder to check out departments other than paint (paint chips) and Formica/counter tops.
With Steam Punk gaining in popularity, look into the nuts and bolts sections for mini washers. There are also a plethora of tapes - painter's tape, drywall mesh and tape, carpet tape and HVAC tape (metallic Heating Ventilation and Air Conditioning tape). I will post more ideas in the future...time for me to hit the hardware store 9it has been awhile!)..
While laying low, I read the September edition of Vamp Stamp News. There was a great list of fun finds at the hardware store. It was a great reminder to check out departments other than paint (paint chips) and Formica/counter tops.
With Steam Punk gaining in popularity, look into the nuts and bolts sections for mini washers. There are also a plethora of tapes - painter's tape, drywall mesh and tape, carpet tape and HVAC tape (metallic Heating Ventilation and Air Conditioning tape). I will post more ideas in the future...time for me to hit the hardware store 9it has been awhile!)..
Saturday, August 21, 2010
Enjoy...

I am in Boston moving my daughter back to school. As the greeting states "Enjoy this day"!
Thursday, August 19, 2010
Twinkling H2O's and Glimmer Glaze


After comparing Twinkling H2O's and Tattered Angel's Glimmer Glaze/Glam, I decided to try painting on white cardstock. I black heat embossed the flower on the same white cardstock. I painted the card on the left with Twinkling H2O's. I used a moderate amount of water to keep the colors vibrant. The card on the left was painted with Glimmer Glaze. As you can see, the colors were more muted - almost like a wash.
Although I like both types of paints, I think I will use the Glimmer Glaze as a background or wash. It is hard to beat the vibrancy of the "Twinks". What do you think you would prefer, and why?
Tuesday, August 17, 2010
Tuesday's Tip
Color is one of the mainstay's of any art project. It can also be one of the biggest stumbling blocks for many crafters. Inspiration can be found in many places. One such place - your rainbow ink pads. They are one great source of color combinations, including monochromatic color schemes.
Saturday, August 14, 2010
Glimmer Glaze/Glam and Twinkling H2O's


On the top card, I painted the tulip images with Twinkling H2O's. I painted the back of the stamped image. The colors are vibrant and dried very quickly. The card below was painted with Glimmer Glaze and Glam from Tattered Angels on the reverse of the image. Although the paints dried quickly, the colors were less intense. The "twinks' can be further diluted to lighten the intensity - I would not recommend lightening the Glimmer Glaze/Glam paints.
For a color that pops, I would recommend the "Twinks". The Glaze and Glam would be fun for a background or stain. I also tried both on white cardstock that has the image embossed. Stay tuned for my next post!
Thursday, August 12, 2010
Tattered Angels Glimmer Glam and Glimmer Glaze

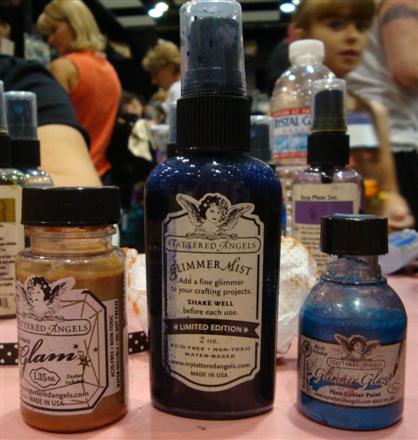
While at the Scrapbook Expo in Santa Clara, I sat at the Tattered Angels booth for a make and take. I have used their Glimmer Mists since they were released and like the sprays. The make and take gave me an opportunity to use their newer products - Glimmer Glam and Glimmer Glaze.
Glam and Glaze are similar to the mists - mica infused water based colorants. Glam and Glaze are to be used as paints. Glaze has a paint brush top, while the Glam will need to be used with a paint brush of your own. We used these to paint printed acetate die cuts (also a Tattered Angels product). The Glimmer Glaze has more colorant than the Glimmer Glam. Think of the Glam as a dilute watercolor with larger pieces of mica.
I used a combination of Glaze and Glam on the automobile on the tag. I used the paints sparingly - think of stained glass. I also painted the reverse side, in the event that it would take a while to dry. The frame and the tag were colored with Glimmer Mists. I decided to try a few other tests of the products - so that meant purchasing a few of each. I will be demonstrating these 2 products over the next couple of blog posts.
Tuesday, August 10, 2010
Tuesday's Tip
During the past week, I had been using fibers and ribbon in a variety of ways. Either as an accent or frame, ribbon/fiber adds texture to your scrap pages or cards.
You can combine fiber with other embellishments to make a frame around an image on a card. Set your focal image to a matte using brads in the corners. Wrap your fiber around the brads for a quick frame!
You can combine fiber with other embellishments to make a frame around an image on a card. Set your focal image to a matte using brads in the corners. Wrap your fiber around the brads for a quick frame!
Saturday, August 7, 2010
Using Fibers

The type of fiber I used on this pages lends itself well to framing photos. It is thin and easy to wrap around the photo edges without adding bulk. I wrapped it around the top left photo of my daughter and her little pumpkin.
All cardstocks and fibers are Club Scrap.
Thursday, August 5, 2010
Using Ribbon
 In Tuesday's Tip, I mentioned that ribbon/fiber makes a fun photo corner. On this 2 page layout, I did just that.
The cardstocks and stamps are all from Club Scrap. I used a burgundy rick rack ribbon on one photo on each page.
Tuesday, August 3, 2010
Tuesday's Tip
On the Club Scrap Forum, the Pro Scrapbooking League is in full force with the challenges and competition. The challenge this week is to use fiber on your cards and scrapbook pages.
A great way to use ribbon, particularly wider varieties, is a photo corners. It is easy to loop the ribbon around the corners of photo mattes or photos.
A great way to use ribbon, particularly wider varieties, is a photo corners. It is easy to loop the ribbon around the corners of photo mattes or photos.
Sunday, August 1, 2010
Greetings-to-Go Part 2
 As I mentioned previously, I resisted this product for years. But, I now really enjoy using some of the pieces and adding my own stamping and embellishments - rather than just using the pieces is the kit.
 I have added punched images, other kit's/company's stamps, brads, and flowers.
The great thing about this product is you can make 15 cards that have their own envelopes. Plus, I often find I have left over pieces to use for different projects. The possibilities are numerous - cards, postcards, cards for gifts. The basic are all there - just add your creativity!
Saturday, July 31, 2010
Quick and Easy Cards
 What is this mess of fiber, tags, and cardstocks? They belong to a Club Scrap product that I resisted for a long time.
Since I began stamping in the early 1990's, I have picked my stamp image, then pulled out the cardstock's I felt would work with my plan for the image. It was rarely a quick project. After becoming a Club Stamp member in 2005, I found it great that the stamp images coordinated with the 8 1/2 x 11 cardstocks - it made some of the decision making go quicker. There was a "Greetings-to-Go" product that contained all you need to create 15 cards. I resisted them for years, mainly because I found it too easy. I mean, where was the stamping and creativity...
I have learned to embrace the "GTG" and add my own twist. The photo above is from Pure and Simple kit's Greetings-to-Go. These are the pieces you can use to create the cards. Stayed tuned for the finished cards!
Subscribe to:
Posts (Atom)