


I have been out of commission - life got in the way! I have successfully moved both kids into their dorms, and am recovering from a bit of the flu. I am anxious to get to doing some fun creating!
While laying low, I read the September edition of Vamp Stamp News. There was a great list of fun finds at the hardware store. It was a great reminder to check out departments other than paint (paint chips) and Formica/counter tops.
With Steam Punk gaining in popularity, look into the nuts and bolts sections for mini washers. There are also a plethora of tapes - painter's tape, drywall mesh and tape, carpet tape and HVAC tape (metallic Heating Ventilation and Air Conditioning tape). I will post more ideas in the future...time for me to hit the hardware store 9it has been awhile!)..
Tuesday, August 31, 2010
Saturday, August 21, 2010
Enjoy...

I am in Boston moving my daughter back to school. As the greeting states "Enjoy this day"!
Thursday, August 19, 2010
Twinkling H2O's and Glimmer Glaze


After comparing Twinkling H2O's and Tattered Angel's Glimmer Glaze/Glam, I decided to try painting on white cardstock. I black heat embossed the flower on the same white cardstock. I painted the card on the left with Twinkling H2O's. I used a moderate amount of water to keep the colors vibrant. The card on the left was painted with Glimmer Glaze. As you can see, the colors were more muted - almost like a wash.
Although I like both types of paints, I think I will use the Glimmer Glaze as a background or wash. It is hard to beat the vibrancy of the "Twinks". What do you think you would prefer, and why?
Tuesday, August 17, 2010
Tuesday's Tip
Color is one of the mainstay's of any art project. It can also be one of the biggest stumbling blocks for many crafters. Inspiration can be found in many places. One such place - your rainbow ink pads. They are one great source of color combinations, including monochromatic color schemes.
Saturday, August 14, 2010
Glimmer Glaze/Glam and Twinkling H2O's


On the top card, I painted the tulip images with Twinkling H2O's. I painted the back of the stamped image. The colors are vibrant and dried very quickly. The card below was painted with Glimmer Glaze and Glam from Tattered Angels on the reverse of the image. Although the paints dried quickly, the colors were less intense. The "twinks' can be further diluted to lighten the intensity - I would not recommend lightening the Glimmer Glaze/Glam paints.
For a color that pops, I would recommend the "Twinks". The Glaze and Glam would be fun for a background or stain. I also tried both on white cardstock that has the image embossed. Stay tuned for my next post!
Thursday, August 12, 2010
Tattered Angels Glimmer Glam and Glimmer Glaze

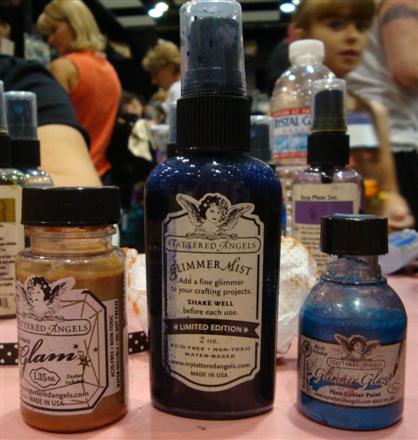
While at the Scrapbook Expo in Santa Clara, I sat at the Tattered Angels booth for a make and take. I have used their Glimmer Mists since they were released and like the sprays. The make and take gave me an opportunity to use their newer products - Glimmer Glam and Glimmer Glaze.
Glam and Glaze are similar to the mists - mica infused water based colorants. Glam and Glaze are to be used as paints. Glaze has a paint brush top, while the Glam will need to be used with a paint brush of your own. We used these to paint printed acetate die cuts (also a Tattered Angels product). The Glimmer Glaze has more colorant than the Glimmer Glam. Think of the Glam as a dilute watercolor with larger pieces of mica.
I used a combination of Glaze and Glam on the automobile on the tag. I used the paints sparingly - think of stained glass. I also painted the reverse side, in the event that it would take a while to dry. The frame and the tag were colored with Glimmer Mists. I decided to try a few other tests of the products - so that meant purchasing a few of each. I will be demonstrating these 2 products over the next couple of blog posts.
Tuesday, August 10, 2010
Tuesday's Tip
During the past week, I had been using fibers and ribbon in a variety of ways. Either as an accent or frame, ribbon/fiber adds texture to your scrap pages or cards.
You can combine fiber with other embellishments to make a frame around an image on a card. Set your focal image to a matte using brads in the corners. Wrap your fiber around the brads for a quick frame!
You can combine fiber with other embellishments to make a frame around an image on a card. Set your focal image to a matte using brads in the corners. Wrap your fiber around the brads for a quick frame!
Saturday, August 7, 2010
Using Fibers

The type of fiber I used on this pages lends itself well to framing photos. It is thin and easy to wrap around the photo edges without adding bulk. I wrapped it around the top left photo of my daughter and her little pumpkin.
All cardstocks and fibers are Club Scrap.
Thursday, August 5, 2010
Using Ribbon
 In Tuesday's Tip, I mentioned that ribbon/fiber makes a fun photo corner. On this 2 page layout, I did just that.
The cardstocks and stamps are all from Club Scrap. I used a burgundy rick rack ribbon on one photo on each page.
Tuesday, August 3, 2010
Tuesday's Tip
On the Club Scrap Forum, the Pro Scrapbooking League is in full force with the challenges and competition. The challenge this week is to use fiber on your cards and scrapbook pages.
A great way to use ribbon, particularly wider varieties, is a photo corners. It is easy to loop the ribbon around the corners of photo mattes or photos.
A great way to use ribbon, particularly wider varieties, is a photo corners. It is easy to loop the ribbon around the corners of photo mattes or photos.
Sunday, August 1, 2010
Greetings-to-Go Part 2
 As I mentioned previously, I resisted this product for years. But, I now really enjoy using some of the pieces and adding my own stamping and embellishments - rather than just using the pieces is the kit.
 I have added punched images, other kit's/company's stamps, brads, and flowers.
The great thing about this product is you can make 15 cards that have their own envelopes. Plus, I often find I have left over pieces to use for different projects. The possibilities are numerous - cards, postcards, cards for gifts. The basic are all there - just add your creativity!
Subscribe to:
Posts (Atom)


