Showing posts with label brayers. Show all posts
Showing posts with label brayers. Show all posts
Monday, November 12, 2012
A Bit of the Holidays


Tuesday, December 13, 2011
Tuesday's Tip
We are mid-way through the Christmas bustle. I am still working on Christmas cards, tags, wrapping, etc. I am not using any flocking or Flower Soft on cards and tags this year. It is a fun accent to use flocking for Santa's beard and trim. After applying the glue and a generous amount of flocking, place a piece of card stock, or part of a non-stick craft mat, over the top. Roll you brayer over the area a couple of times. Then, leave it to dry thoroughly. You should find that the flocking will stick better and provide better coverage. This will also work when using Flower Soft.
Wednesday, May 11, 2011
Squirrely Challenge
This week's Squirrely Challenge is Technique Junkies Bohemian Layers. I used Club Scrap's Blossom kit for this card. The technique uses 3 shades of the same color ink applied with a brayer over heat embossed images.
 I applied the inks in a circular pattern, rather than linear, with the lightest color in the center. To see other interpretations of this technique, visit the blogs of the other "Squirrel Girls":
Nancy , Jen, Chrissie, Diana, and Julie.

Nancy , Jen, Chrissie, Diana, and Julie.
Tuesday, November 30, 2010
Tuesday's Tip

Friday, April 16, 2010
Dry Embossing and Sanding
 One of the more popular cardstock products available today comes with a white core. That usually means the color was applied on top of the original paper. Many companies have used this paper making technique - it had been a sign of cheap paper. Now, with the popularity of embossing folders for dry embossing and sandpaper brought into the craft room, there are great reasons to choose this type of paper.
Or, you can make your own. I took white glossy cardstock and brayered rainbow dye ink over the top. Once the panel was dry, I ran it through my Big Shot using a Cuttlebug embossing folder. While the panel was still in the folder, I sanded the color off the raised portions. Quick and easy - although a bit dusty. I will show a couple of other options in the coming days.
I am still recovering from foot surgery, so my creative time has been limited. I am hoping to be back in good form by sometime next week.
Tuesday, April 13, 2010
Playing with Gesso
 Last post, I used gesso in a resist technique. The above card was painted with gesso after I brayered rainbow dye ink over glossy white cardstock. I dry brushed the gesso on horizontally and vertically, lightly so as not to obscure the ink colors.
 Once the gesso was dry, I embossed the panel in an embossing folder using my Big Shot. To bring out the pattern, I sanded some of the color off the raised portion of the pattern. Trim, matte and embellish!
Monday, April 5, 2010
Gesso Resists
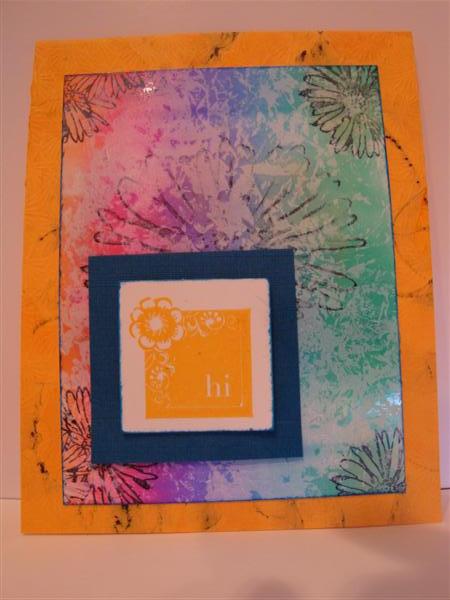
 These two cards have a slightly different resist technique from those previously posted. This technique still involves stamping on glossy, white cardstock, and brayering with a rainbow ink pad. However, we will add a little gesso and a little dye reinkers.
This technique is from "Technique Junkies" newsletter and is great fun. I have altered the steps a bit for these cards. Stamp your image with a permanent ink (I used StazOn) . I then added a little color from watered down dye reinkers (a little metallic gold). Once dry, scrunch up some wax paper ("scrunch" being my technical term!) and dip it into the gesso. Dab the gesso over the cardstock - leaving white areas. Once dry, brayer with the rainbow pad of choice. It does not take the gesso very long to dry as long as it is not applied too thick.
All cardstocks and background stamp images are from Club Scrap. The square stamp images are from Stampin' Up. If trying different techniques interest you, I highly recommend that you visit Technique Junkies and order a CD or two and/or subscribe to the newsletter.
Thursday, January 28, 2010
GAB Page
 Can you tell I'm attempting to complete the remainder of these book pages? This was one of the more difficult topics - not being an organized religion person. However, I did find some images that would work. And, I used an "old" brayer technique.
With the advent of new items and techniques, I find I seldom look back at techniques popular a couple of years ago (let alone a decade ago). Brayers were, at one time, all the rage. These handheld rubber rollers were used to lay down background ink from solid color or rainbow stamp pads, ink large stamps, and print images. These techniques worked best on glossy cardstock.
Since I did not have a rainbow pad large enough to cover the glossy cardstock I was using, I improvised with single color pads. The Ranger Adirondack blues blended quite well. Unfortunately, the black on the bottom portion was not as cooperative. All the images were stamped on matte coat cardstock, cut out, and added to the background.
Finished page! I am off to put these in the mail. Think back to some of your favorite older techniques and start to use them again. Think of it as a blast from the past!
Subscribe to:
Posts (Atom)