


Thursday, March 31, 2011
Einsteinium ATC
I completed my last ATC for the "Elements" ATC swap in which I am participating. It was a bit tedious cutting out and popping up all the pieces. And, yes, the edges are colored in medium gray!
 I think I should have reversed the element abbreviation and the formula, but was not going to start all over again. The background is layered with Da Vinci backward handwriting and some circular stamps from Club Scrap's Solstice. I also edged the entire card in blue ink to tie all the colors together and give a more finished edge.
Tuesday, March 29, 2011
Tuesday's Tip
While making cards for PSL (it is finally over!) and other projects, I was grabbing various white card stock bases. Obviously, different weights and textures of card stock will take media differently. I had been using smooth coated card stock for stamping and embossing. But, I should have paid closer attention to my mail art postcard bases as I used Pan Pastels to add color. Just a reminder that the type of card stock matters. Sometimes when we are in a creative frenzy, we tend to grab our usual materials. Take a few moments to think about the coloring media you will be using and pick appropriately.
Sunday, March 27, 2011
Blogger Issues
Just found out that IE-Blogger connection is not working - hence the loss of photos. Hopefully, this will be fixed before my next post. Otherwise, photos can be viewed on Facebook Creating with Connie.
Thanks for your patience!
Thanks for your patience!
Photos?
For some reason, the photos in the "Favorite Page" post are not visible. I just tried to repost here with no luck. So, hopefully, whatever glitch blogger is having will be fixed soon. I will try again then.
My Favorite Pages
I scrapped a few pages for this last week of PSL. I had originally planned to complete the 8 x 8 album I am making my daughter (and myself) of our trip to France for her high school graduation. Today, I worked on the photos from Giverny and Monet's estate.

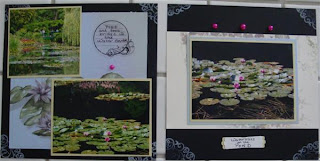

 I really like this page in particular. I attempted to copy one of Monet's paintings, taking photos from different locations. A close-up of the photo is below:

 The key to getting the photo I wanted was to take my time and try different angles. Do you have certain photos that are favorites? Get them out of the box onto a page. It took me a while, but that is what I did today.


This was my favorite of the 2 page spreads. I took a number of photos in the Water Garden and the Pond.


Wednesday, March 23, 2011
Makeover


Tuesday, March 22, 2011
Tuesday's Tip
Today's tip centers around color combinations. As a member of Club Scrap, I receive a color coordinated kit monthly. If you shop at your local scrapbook store, you may purchase a color coordinated paper kit from a company like Basic Gray (one of my favorites for patterned paper). Sometimes, I find the color combinations are not quite my cup of tea. Last month's kit paired lime green with red (and some neutrals). Although I love red, it just did not work for me combined with the green. So, I combined the green with a pink. After all, pink is the "in color" for 2011.
 The above is a sample of the combination. For all you CS users, try this combination, or make up one of your own. Not a Club Scrap user? Try adding a pop color to one of your paper kits for some added mileage.

Monday, March 21, 2011
More Mail Art
Real life has taken most of my time this past few days. I was on a bit of a roll one day last week and created a few fun bits and pieces.
 The above piece of mail art was created a long with the Moon Man. In addition to adding color with Distress Inks, I was playing with Glaze and Souffle pens. The border of the garden plan was double outlined with a combination of these pens. I really like the combination of glossy and mat. Have you given these pens a try? They create interesting effects!

Friday, March 18, 2011
Mail Art

Thursday, March 17, 2011
Transparency Fun


Tuesday, March 15, 2011
Tuesday's Tip
There a plethora of decorative and colorful brads on the market. If you are like me, you probably have several colors and shapes. I often use brads as decorative embellishments on a card or page. But, remember that they work well in fixing mats to cards or scrapbook pages. After all, they were originally marketed as a paper fastener. With so many decorative uses, we may forget their original purpose.
Monday, March 14, 2011
Busy Day
Today was quite the busy and productive day. Have you had one of these lately? There were so many ideas that I wanted to try it was difficult to find a starting point. PSL is in full swing, so I should be helping my teams with scrapbooking and/or card making. But...the art journal and mail art were calling to me! So, I ended up doing a little of each (well, except the scrapping).
My last project of the day was making cards for my Club Scrap card team. Our challenge this week really is a challenge - using Club Scrap stickers. I am not a sticker person - never have been. I always figure that with all the rubber stamps I own, I can make my own stickers in the exact colors I need/want. Well, I gave it a shot:
 I am still not a sticker fan - at least for cards. I will admit that alphabet stickers are periodically useful for scrapbook pages. How about you - fan or no?
My last project of the day was making cards for my Club Scrap card team. Our challenge this week really is a challenge - using Club Scrap stickers. I am not a sticker person - never have been. I always figure that with all the rubber stamps I own, I can make my own stickers in the exact colors I need/want. Well, I gave it a shot:

Friday, March 11, 2011
Torn Strips

Wednesday, March 9, 2011
Using Decorative Tape

Tuesday, March 8, 2011
Tuesday's Tip
This is another old time tip that I recently had to use. With PSL and all the scrap booking I have been doing, I sometimes get a bit over-zealous with my ATG gun and adhesive. I had VERY SECURELY adhered a matted photo, when I decided I needed to move it a bit. Peeling it up was not an option as it would tear all the papers involved. I un-raveled some dental floss and slowly moved it between the mat and the base page. It took a bit of time (remember, I said "securely"!), but I was able to lift the photo up and re-position it without damage. Keep some waxed floss handy for your next little mistake.
Sunday, March 6, 2011
CASE-ing


Saturday, March 5, 2011
Art Journal Fun

Thursday, March 3, 2011
Quilted Embossed Cards


This card is a slightly different variation of the above. The same technique was used - I just added a ribbon.
Wednesday, March 2, 2011
Art Journaling

Tuesday, March 1, 2011
Tuesday's Tip
I spent the weekend in collage and art journal workshops. We used a lot of gel medium to glue various papers and materials. I usually like to use a wood handled paint brush (not a foam brush), which I wash and use many times. Sometimes, during all the washing, the bristles start to fray and pull out.. To get a little more mileage out of the brush, I will trim the bristles to even them out. Give it a try!
Subscribe to:
Posts (Atom)


